
Apart from the basic concepts of HTML, CSS, and JavaScript, one of the most powerful things you can learn to really feel comfortable in Service Portal is AngularJS scopes.
There are many resources online which do a great job of explaining AngularJS scopes; there’s really no better than what can be found in the official AngularJS documentation. However, there’s nothing I’m aware of which is targeted at someone who’s getting started in Service Portal, has the basic knowledge of creating a widget, but still feels confused about what’s actually going on behind the scenes. Hopefully after reading this article some of that fog of confusion will have lifted.
Once you understand scopes, the amount of road blocks you’ll hit when developing widgets will dramatically lower, and you’ll be well on your way to becoming a Service Portal master!
This is my first post in what will hopefully become a series of articles helping to explain the basic concepts of Service Portal. If you have any suggestions for topics, feel free to leave a comment below, or reach out to me on twitter with my handle @dylanlindgren.
The DOM
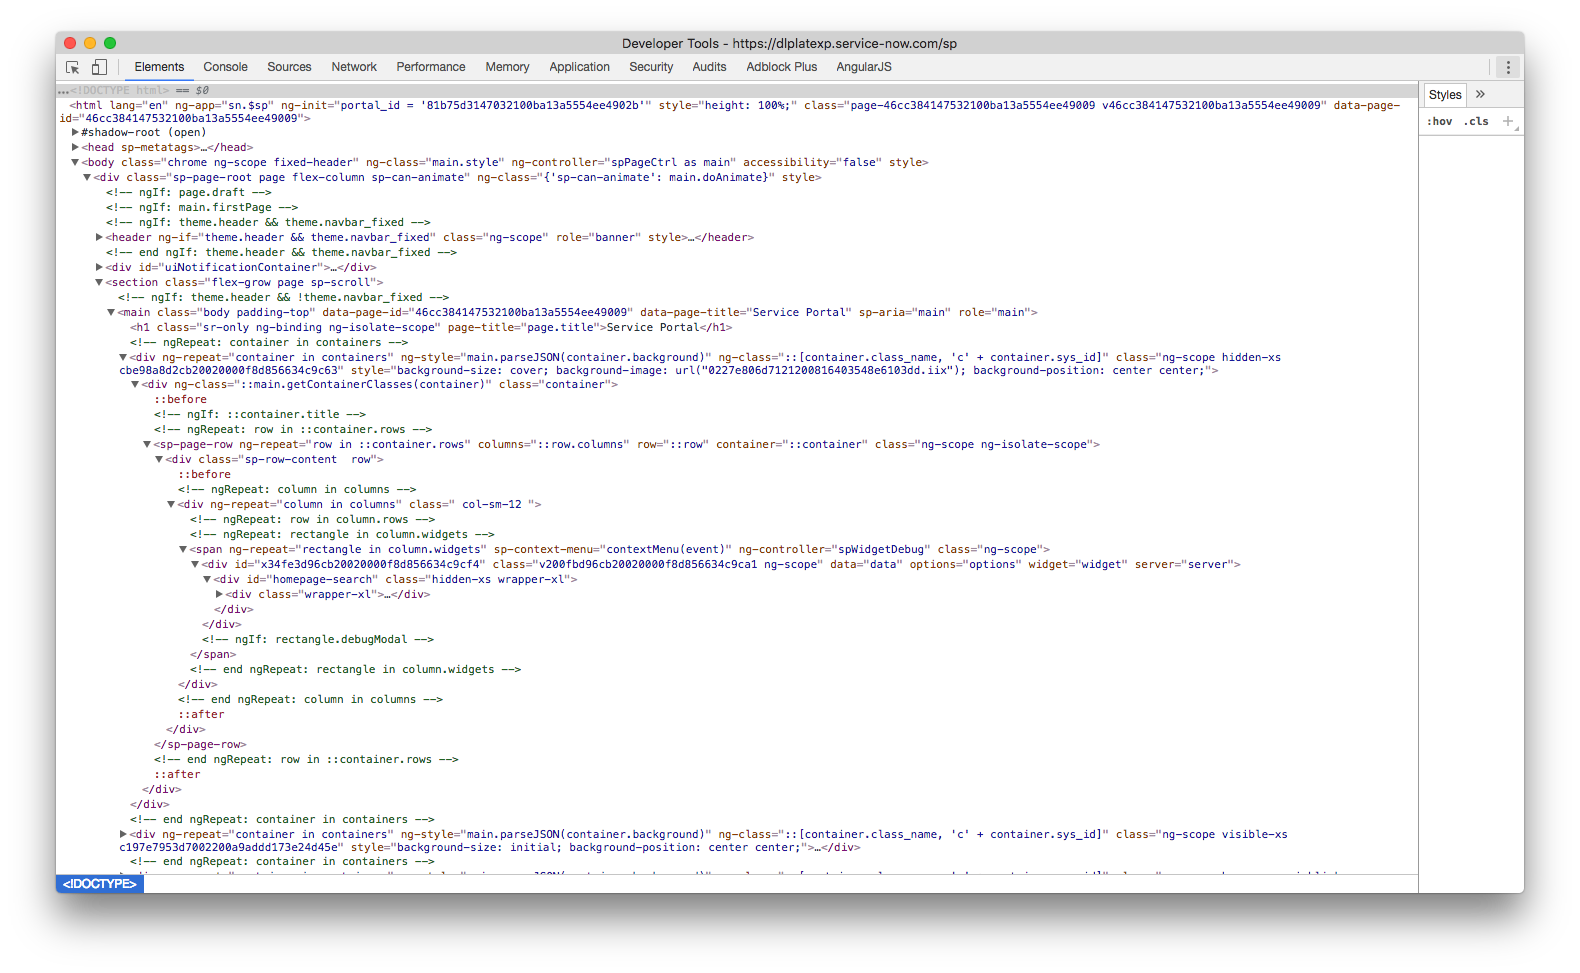
Given that you’re reading this article, it’s likely that you’ve ventured into the developer tools of your web browser on at least a few occasions. Perhaps after a sudden fit of anxiety at the overwhelming amount of information in there, the first thing you’ll have noticed is a tree-like structure of elements, within elements, within elements, and so on. This structure is a live, visual representation of the current state of something called the Document Object Model of the page you are on; for short it’s called the DOM.
The description of the DOM from the Mozilla Developer Network is as follows:
The Document Object Model (DOM) […] represents the page so that programs can change the document structure, style and content. The DOM represents the document as nodes and objects.
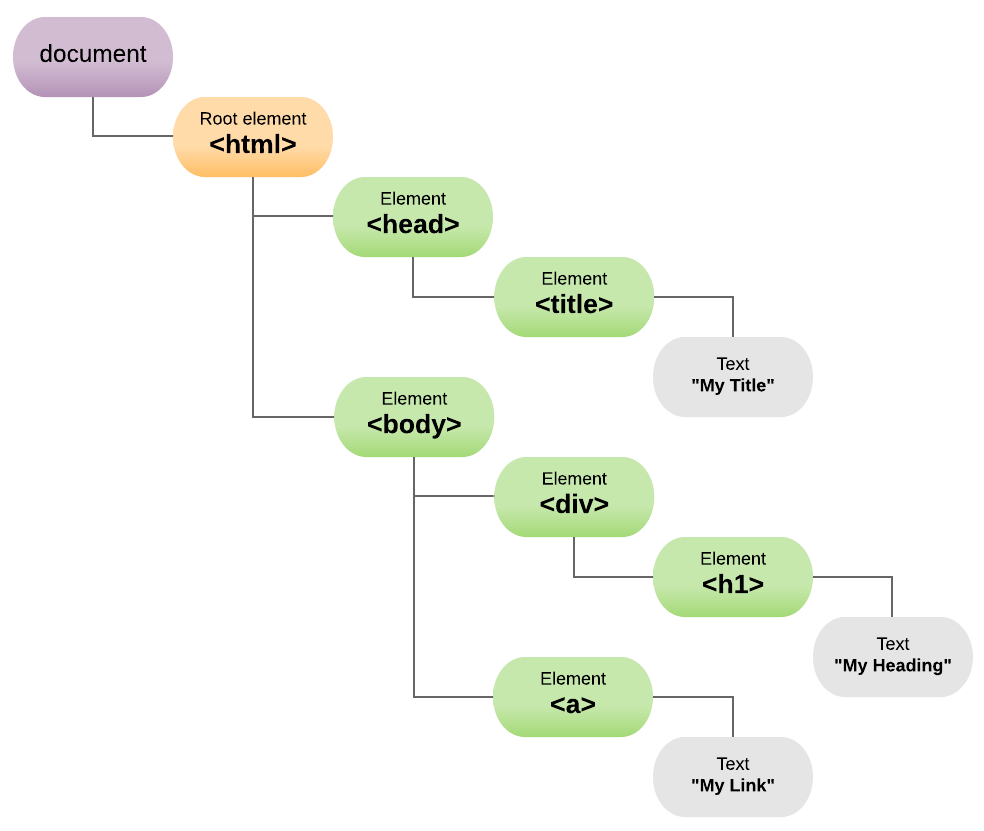
Shown in another way, you can really see how this parent & child relationship that each DOM element has goes in to building what you see in your browser window. Note that the “stacking” of elements shows the parent & child relationships of the elements on the page.
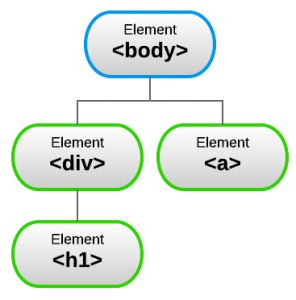
The key point to understand about the DOM is that it is a “tree” of elements, like in this hypothetical DOM tree:
Directives
A comprehensive definition of an directive can be found on the AngularJS documentation:
At a high level, directives are markers on a DOM element […] that tell AngularJS […] to attach a specified behavior to that DOM element […], or even to transform the DOM element and its children.
To rephrase that, any element within the DOM can have a directive attached to it, and you can use the directive to give the element custom behaviour.
This element you’re targeting could be anything, such as an image, a header, a list, or even a container div element (which may have many elements within it). And the custom behaviour you give to it could be an animation, to load some text into it from an external website, or even hide it from the page completely; it’s up to the creator of the directive. This allows developers to build their own reusable components which do not exist natively in HTML, such as a login button that has a particular style/functionality, or a list of records.
So in the case of the hypothetical DOM tree I showed earlier, perhaps the elements with a green border below might have directives associated with them.
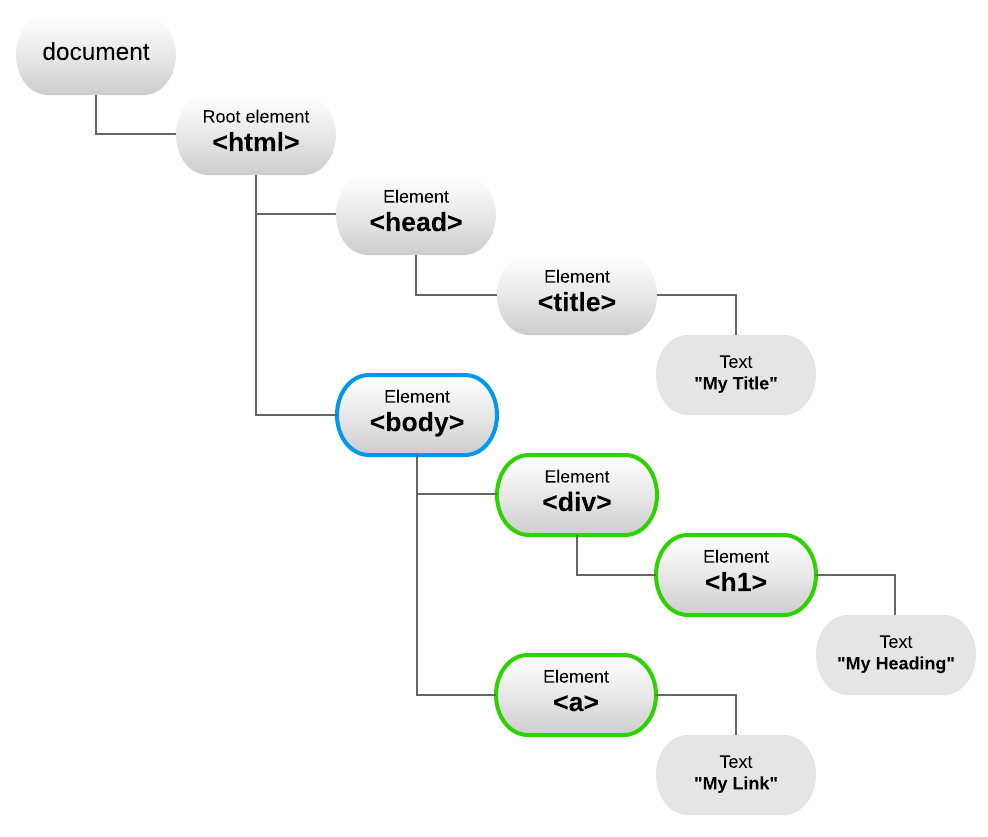
Note that the element with the blue border is the element on the page with the attribute ng-app. In AngularJS the element with this attribute is considered the root element of the application. It’s only the elements below this which Angular treats as part of the application.
Let’s just show the AngularJS-related elements of the DOM, and rotate it so it looks more like a “tree” (albeit, one that’s upside down!)
Directives, a.k.a Widgets
You might now be asking yourself…
Why am I reading about directives? How does this relate to Service Portal?
Well, Service Portal widgets are directives. When you load a Service Portal page, a new AngularJS directive is created for each different widget on the page. This directive is then placed in the DOM wherever the widget was put on the page via Service Portal Designer or Page Editor. As you know from the previous section, a directive adds custom behaviour, and in the case of a widget this behaviour is to insert the HTML from the widget, and perform the actions you define within the client script and/or link function of the widget.
So why are there two names for the same thing? Well, there’s lots of functionality that’s been added to widgets to make them easier to work with, such as options, the addition of the server-side behaviour that happens in it’s server script, and the passing of the data variable generated in it to the client script.
So in the case of widgets, the hypothetical structure of the directives from the previous section could be like so:
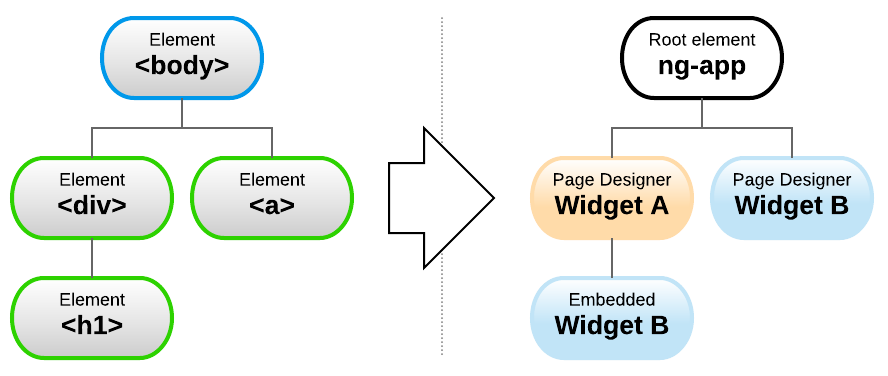
You’ll notice above there’s an “embedded” Widget B, and is not added via Page Designer. This widget is embedded in Widget A as described on the official ServiceNow Documentation. This is actually the only way that you’d end up having a widget sitting below another widget in the DOM.
Scopes
One characteristic that’s just as important to a widget as it is to a directive is scopes. A scope can be thought of as a space where application functionality is contained to. By default a directive will share the scope of it’s parent directive, however they can also be set to have a new, isolated scope.
In Service Portal a widget always has an isolated scope. This is something that has been set by the developers of Service Portal to ensure widgets play nicely together, and that you can have multiple instances of the same widget on a single page as they all have their own isolated space to play.
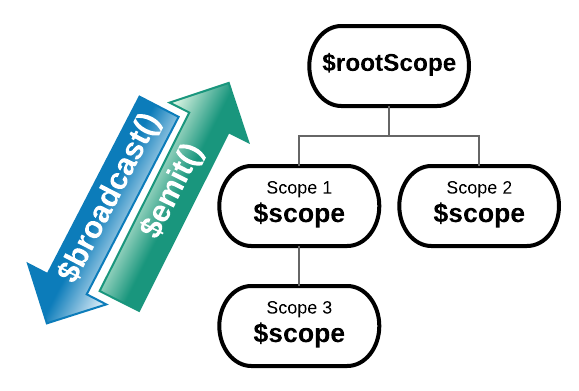
The scope tree
Not just is the DOM a tree, but scopes sit in a tree as well. You can think of the scope tree as a cut-down version of the DOM tree, with all the things that didn’t create a new scope removed. As all widgets create a new scope then the scope tree in the example above would look like so:

Local scope vs Root scope
You’ll have noticed in the above diagram that at the top of the tree is a thing called $rootScope. You can think of this as an overarching scope that is available to your whole application, from any widget/directive. It also allows you to listen for/broadcast events, but more on that in the next section.
Cross-scope communication
All widgets have isolated scopes, so how can we access data from one widget in another widget? There’s two ways:
Events
Similar to the concept of events in ServiceNow, AngularJS events can be announced from any scope in your application. These events can be listened from any scope as well, however which method you use to announce the event will have an impact on which scopes will hear it.
There are two methods you can use to announce events:
- With
$broadcast(), the event will travel down in the scope tree from wherever it was announced, until it hits the bottom. The event will not be heard by sibling scopes. See more on the official AngularJS documentation. - Using
$emit(), the event will travel up in the scope tree from wherever it was announced, until it hits the$rootScope. This event will not be heard by sibling scopes. See more on the official AngularJS documentation.
So now that we know how announce an event, how do we listen for it? For that, we can use the $on() method. When you use this method, you supply it with a function and whenever that event is heard by the scope the function will be called. See more about this on the official Angular JS documentation.
The $broadcast() and $on() functions are also available on $rootScope, which gives you another place to listen for/announce an event to ensure the right scopes will hear it.
Angular Providers
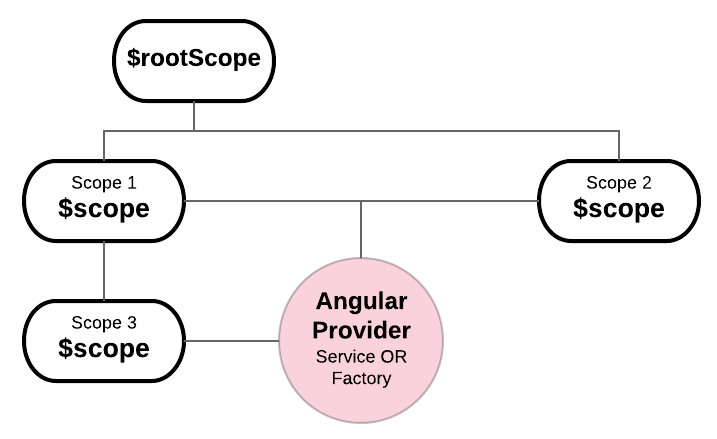
Another means of communication between widgets is a service or a factory, which in Service Portal are both types of Angular Providers. Services and factories in AngularJS basically offer a place where you can define functions and variables, and any scope which has access to it can use them.
The diagram below visualises where these sit in relation to the scopes, if for all 3 widgets in our example the Angular Provider was added to their related lists.
Given the overwhelming amount of information in this article already, I’ll cover in detail how one would use an Angular Provider in a future instalment.
Conclusion
In the next instalment in this series, we will look into how to put this theory into practice by making a series of widgets which communicate with each other. Specifically, how to create a widget showing a list, that reacts and updates with new information when you change a field on the out-of-box form widget.
If you’d like to read more about AngularJS scopes, I’ve put together some further reading links below:
- https://docs.angularjs.org/guide/scope
- https://github.com/angular/angular.js/wiki/Understanding-Scopes
- https://docs.angularjs.org/api/ng/type/$rootScope.Scope
Well, that’s it for scopes! Feel free to leave feedback in the comments below, or reach out to me on twitter with my handle @dylanlindgren if you’d like to buy me a beer! 😉
Great Article Dylan! Can’t wait for the next in the series.
Great article.
Thanks Dylan, Service Portal is way clearer to me now 🙂
Thanks Dylan, I’m looking forward to your next article.