
There is an update to this post, published in Feburary 2021. Click here to read it.
Congratulations! You’ve built an amazing Service Portal widget. In fact, it’s become so popular inside your company that everyone wants it to be shown on all kinds of different sites and services they offer. These all use different web technologies, and are run through different domain names. You know they all allow you to customise the HTML code, so theoretically it should be possible, but exactly how do you do it?
A ServiceNow instance is run through the service-now.com domain, and it’s a not-uncommon requirement to want to embed a Service Portal widget in websites hosted on other domains. Modern web browsers are very particular about exactly this practice, and for good reason. Let me explain.
Imagine a “wild-west” scenario where web pages were free to include any website from any domain they want. One could run a malicious website on a domain name similar to that of a commonly-misspelt secure service; say, a bank. They could embed the real bank’s website inside their website, so that it takes up the whole page and appears no different to the actual bank website to the untrained eye. What makes this scenario even more dangerous would be throwing JavaScript into the mix, as people could lose a lot of money when the page they visited starts using it to manipulate the real bank page to transfer money from their bank accounts!
Possible Approaches
The security practices that web browsers have implemented to mitigate this risk will impact the methods we can use, and with this in mind, here they are:
- iframes
Create a Service Portal page containing the widget, and include that inside an iframe - Direct include
Create a Service Portal page containing the widget, use JavaScript to fetch the HTML of the page, and to include it directly inside the HTML code of your page (e.g. via the AngularJS ngInclude directive).
As horrible as they are for user experience, sometimes iframes are just unavoidable, and for this scenario that is certainly the case. The reason why is that there are two HTTP headers that modern web browsers want a server to send to control whether the methods should be allowed, and there’s only one of them configurable in ServiceNow:
- X-Frame-Options
- Controls whether the page can be embedded in an iframe.
- Whether this header is sent or not is configurable using the glide.set_x_frame_options system property.
- If the header is not sent, it can be embedded in an iframe in any website.
- Access-Control-Allow-Origin
- Controls whether JavaScript can be used to interact with content retrieved from the server in a different domain (e.g. to embed it).
- Not sent or configurable by ServiceNow.
- Must be sent to allow the controlled behaviour.
What this means is that we can rule out the “direct include” option 2 as the Access-Control-Allow-Origin header must be set for that method to work. So the only option we have left is to use iframes.
Trying It Out
Look, it works! The widget I built generates a random width and height and sets itself to be that size. This simulates the randomness that you would get if you were trying to embed a widget with an unknown size (for instance the list widget, which varies in height depending on the number of records showing in it).
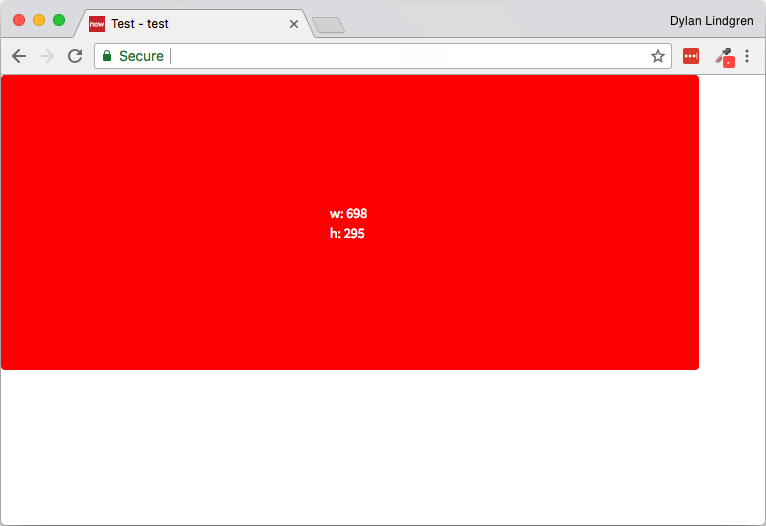
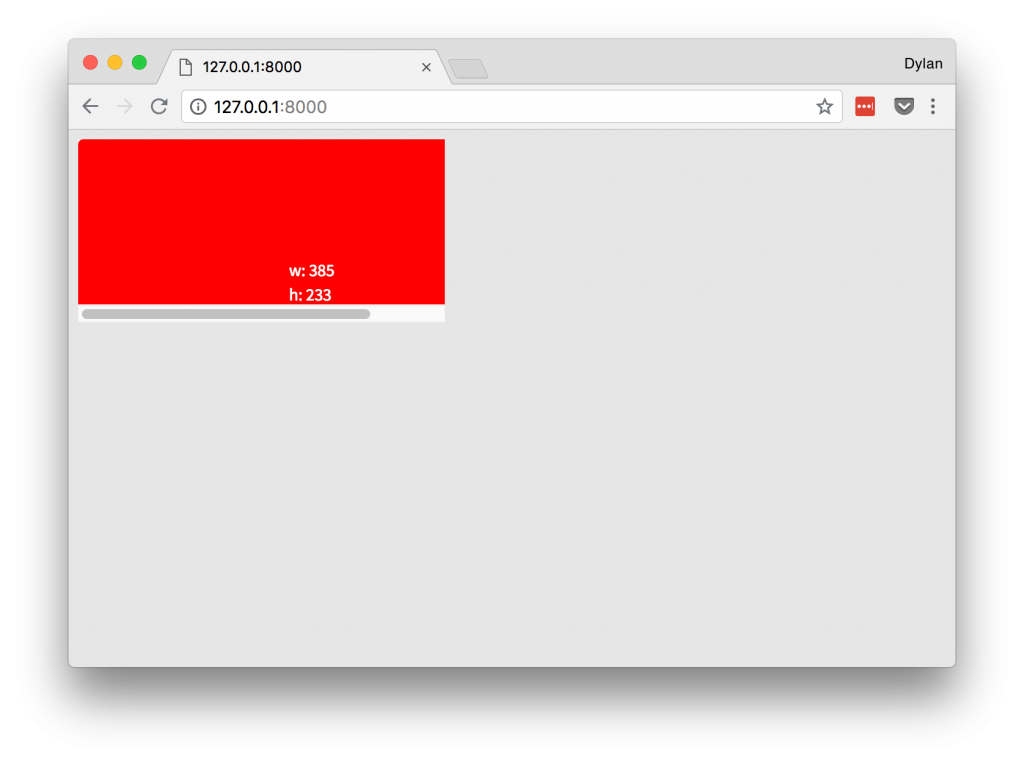
Even those without an eye for detail will notice that my widget is only partly showing, and there are scrollbars on the iframe. This is because by default an iframe is 300px wide by 150px high, and the widget is bigger than that. Here’s the kicker. Normally we could use JavaScript to reach into the content of the iframe, see how wide and tall it is, and adjust the size of the iframe to accommodate. But, the Access-Control-Allow-Origin header needs to be sent to allow us to do this, and if ServiceNow doesn’t send it, how can iframes be a viable solution for us?
Let me introduce to you, our saviour, the window.postMessage API.
The
window.postMessage()method safely enables cross-origin communication betweenWindowobjects; e.g., between a page and a pop-up that it spawned, or between a page and an iframe embedded within it.Normally, scripts on different pages are allowed to access each other if and only if the pages they originate from share the same protocol, port number, and host (also known as the “same-origin policy“).
window.postMessage()provides a controlled mechanism to securely circumvent this restriction (if used properly).
What this means is that we are going to reverse the approach we will take. We were going to get the outer page to reach into the page contained in the iframe, detect it’s size, and adjust the dimensions of the iframe to suit. Instead of doing this, we will use JavaScript in the inner page to post a message containing its size to the outer frame, and listen for that message from JavaScript on the outer page.
Using the window.postMessage API
The Widget Link Function
We’re going to start by detecting the size of the widget in it’s link function, and sending it to the parent page.
function (scope, elem, attr) {

var $timeout = $injector.get('$timeout');
var $window = $injector.get('$window');

elem[0].style.display = 'inline-block';

$timeout(function () {

var size = {
width: elem.innerWidth(),
height: elem.innerHeight()
};

$window.parent.postMessage(size, '*');

}, 0);

}
What’s going on here?
- On lines 3 and 4 we’re getting our dependencies.
- By default, the widget element has the
displaycss property set toblock, which means it will take up the full width of the page regardless of it’s content. We need to change this toinline-blockto ensure that it reduces down the size of just the content. - We’re using the
$timeoutAngularJS service to delay execution of the function passed into it until the page has finished loading. - On lines 10 to 13 we’re creating a size object (containing the width and height of the widget) which we will send to the outer page.
- On line 15 we’re using the
postMessagemethod on thewindowobject to send thesizeobject to the parent page. If needed we can use the second parameter to control which domains will receive the message. The*string indicates that we have no preference.
The Outer Page
Here, we’re simply using the addEventListener function to capture the size object sent by the page in the iframe, and setting the iframe to be that height.
<html>

<head>
<script>

window.addEventListener("message", receiveMessage, false);

function receiveMessage(event) {

size = event.data;

iFrame = document.getElementById('myiframe');

iFrame.style.height = size.height;
iFrame.style.width = size.width;
}

</script>
</head>

<body style="background-color: rgb(230, 230, 230)">
<iframe id="myiframe" src="https://MYINSTANCE.service-now.com/test?id=test"
frameborder="0" scrolling="no"></iframe>
</body>

</html>
The Finished Product
Let me know in the comments below if you have any ideas for ways this method could be improved, or any alternate methods that I might have missed! Also, follow me on Twitter @dylanlindgren to keep up to date with new posts!
1 thought on “Displaying Service Portal Widgets Outside ServiceNow”