
Agent Workspace is built on the great new Now Experience UI Framework. For those used to developing on the traditional ServiceNow interface, things have changed a bit! One of those things that’s changed is how you would create a modal dialog box, meaning you can say goodbye to GlideModal! This article describes how you can develop a Now UI Experience Framework component, and surface it in Agent Workspace in a modal in a way that’s connected to the form context you’re launching it from.
Prerequisites
Part of the answer is already covered on the official ServiceNow Documentation site, on the page “render a now component in a modal“. However, it covers only what to do once you have created a component, but not how to create a component that can interact with a modal itself.
Something worth noting is that it mentions you need to create a record in the sys_aw_registered_scripting_modal table, however the ACL’s applied to this table at least in the Orlando release of ServiceNow are set to only allow users with the maint role to do so. So the first thing you’ll need to do is modify those ACL’s. There’s one for each action (create, read, write, delete) you’ll need to modify. You can simply just enable the Admin overrides checkbox on each of these ACL’s for a quick-fix to allow users with the admin role to edit records in this table, or specifically modify the ACL’s the allow more granular permissions.
Deployment
Let’s first see what we need to do to get an already-created component from our local machine into an instance, and associate it with an Agent Workspace UI Action.
- From the directory of the component, use the
now-cli deploycommand to deploy it to your instance. - As an admin, create a new record in the
sys_aw_registered_scripting_modaltable.- Component: point this reference field to the component you deployed in step 1.
- API: a function name which you will use to launch this modal from a UI Action, for example
openMyModalNoworopenUserFeedbackModal. It can be anything you want, but it must be unique for the scope you’re creating this record in.
- Copy the value from the automatically populated Public API field. This will contain a concatenation separated by periods of
g_modal+ the scope you’re in + the API name you chose in the previous step, for exampleg_modal.global.openCompModalTest(). You can use this code in an Agent Workspace UI Action client script to open your modal. - Create a UI Action applied to the table you want to open the modal from. Set an action name, and ensure one of the “workspace” options is enabled (button or menu). This will determined whether your UI action appears as a main button at the top right of the Agent Workspace screen, or hidden within the menu at the top right of the screen.
- In the workspace client script, use code similar to the below:
function onClick(g_form) {

    // Build the data you want to pass to your component here.
    // Example:
    var myOptions = [{
        id: 'it',
        label: 'IT Workflows'
    },{
        id: 'customer',
        label: 'Customer Workflows'
    },{
        id: 'employee',
        label: 'Employee Workflows'
    }];

    g_modal.global.openCompModalTest({
        title: 'Please select a workflow!',
        confirmTitle: "OK",
        cancelTitle: "Cancel",
        size: 'sm',
        height: 'md',
        params:{
            options: myOptions,
            selectedValue: myOptions[0].id
        }
    }).then(function (modalResult) {
        // Code to handle the result of your modal here.
        // Example:
        g_form.setValue('my_field', modalResult.selectedValue);
    });

}
Registered Scripting Modal Parameter
As you can see in the example above, the auto-generated functions you use to call your modal (e.g. g_modal.global.openCompModalTest()) accept an object as a parameter, which has a number of properties you can define on it.
title: the title of the modal dialog windowconfirmTitle: the label of the “OK” buttoncancelTitle: the label of the “Close” buttonsize: from testing I believesm,lg,xl, andfware accepted valuesheight: a height (in pixels) for the modalparams: the parameters to pass in to the inner component
The params property is probably the most important one to highlight. It’s how you can pass context from your form (for example, the sysId of the record you’re on, or the value from a form field obtained by g_form.getValue()) into your component. In the example above, I’ve hard-coded an array containing a list of items (ServiceNow workflows) all having both an id, and a label. The object supplied as params gets passed into the component inside the modal as it’s properties.
You can also see the auto-generated function returns a promise, and the function passed into then() that’s called when the promise is resolved will get a parameter passed into it. This parameter I’ve called modalResult in my example, and contains the data passed back to the UI Script from the modal.
Creating the Component
Now we know we can pass values into the component through the params property, and receive data from the component using the first parameter of the callback function that executes when the modal closes (modalResult in my example). We can now look into using these params inside a component, and broadcasting data out of the component into the callback function.
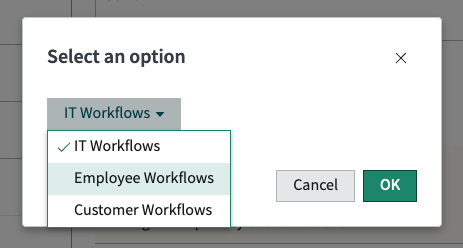
The component shown in the screenshot above is one I created called snc-component-modal-test. It simply accepts as properties two things:
- options:
- selectedValue
It shows a dropdown list of the options supplied to it (options), and accepts a default selected value (selectedValue).
import { createCustomElement } from '@servicenow/ui-core';
import snabbdom from '@servicenow/ui-renderer-snabbdom';
import '@servicenow/now-dropdown';
import styles from './styles.scss';

const handleSelect = ({action, dispatch}) => {
	dispatch('SN_SCRIPTED_MODAL#DATA_SET', {
		selectedValue: properties.selectedValue
	});
}

const view = ({properties}, dispatch) => {

	dispatch('SN_SCRIPTED_MODAL#DATA_SET', {
		selectedValue: properties.selectedValue
	});

	return (
		<div>
			<now-dropdown
				items={properties.options}
				size="md"
				select="single"
				selected-items={[properties.selectedValue]}
			/>
		</div>
	);
};

createCustomElement('snc-component-modal-test', {
	renderer: { type: snabbdom },
	view,
	styles,
	actionHandlers: {
		'NOW_DROPDOWN#SELECTED_ITEMS_SET': handleSelect
	},
	properties: {
		options: {
			default: [{
				label: 'First Option',
				id: 'one'
			}, {
				label: 'Option 2',
				id: 'two'
			}]
		},
		selectedValue: {
			default: 'one'
		}
	}
});
Some notes to explain the above:
- I’m using the
now-dropdowncomponent so that I didn’t need to create a dropdown myself. You can install this using the commandnpm install @servicenow/now-dropdown. Other standard components are documented on the official ServiceNow Developer website. - The
now-dropdowncomponent has the actionNOW_DROPDOWN#SELECTED_ITEMS_SET, which gets called when the selected item(s) change. To respond to this action, I have thehandleSelectfunction being called. - The component built into Agent Workspace to create modals has the
SN_SCRIPTED_MODAL#DATA_SETaction, which you can dispatch to update the data that will be passed back to your client script.- I’m dispatching this action to set the the
selectedValueproperty.
- I’m dispatching this action to set the the
- In the UI Action’s client script, I’m using this data from the
selectedValueproperty to update my form usingg_formas per a normal client script within the callback function that gets executed when the modal is closed.
Once you’ve created your component, you can deploy it to your instance as per the steps in the previous section. If you’ve already deployed the component, you’ll need to use the --force option to overwrite the existing component on the instance.
Conclusion
If you have any questions, or you’ve discovered some additional information about using Modals in Agent Workspace, please leave a comment below or reach out to me on twitter using my handle @dylanlindgren!