
Record producers are immensely valuable in how they enhance the experience of a requestor in ServiceNow. Instead of having them use a regular form – which mandates directly using the fields that exist on the table itself – you can tailor the experience they follow when creating records in a way that makes sense for them.
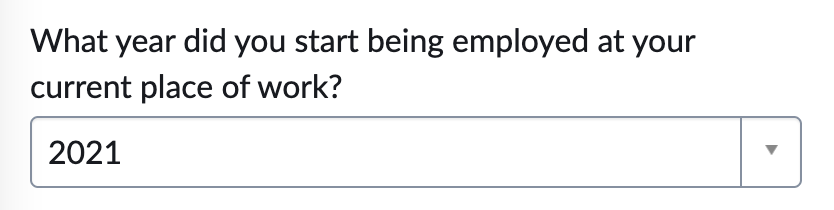
For example you might have a field on the table which captures the date the requestor started employment at a company called “Work Start Year”. This field name absolutely makes sense for a fulfiller as they work with these records daily. However, for a requestor it would be much better were they to see a more lengthy question that describes the purpose of the field clearly. For example, “What year did you start being employed at your current place of work?”.

Surfacing the regular form directly means compromising one of these experiences. Either you have something that works for the requestor and clutters the interface for the fulfiler, or something that works for the fulfiller but confuses the requestor. You might also try something in the middle, that doesn’t work well for either persona.
Having a different experience for the requestor and the fulfiller can easily be acheived with a Record Producer, as they allow you to define variables which take the form of questions presented to the fulfiller. Once submitted, the values can be mapped to a field on the table the record producer is creating records for. The value chosen for the example field on the left above, can be fed directly into the field on the right.
Another case where a record producer is beneficial is in combining multiple questions completed by a requestor into a single field shown to the fulfiller. In the case of the below example we are individually listing newsletters for the requestor to subscribe to next to checkboxes, and then combining those selected into a list field in ServiceNow, showing only those newsletters that were subscribed to.


There’s many other ways that a Record Producer can be valuable to the user experience of a requestor. However they have one big drawback: they don’t really support the concept of a “draft”. Sure, you can add a record producer to a “wish list”, but you can only do this once per record producer, and again the user experience isn’t great as then the requestor has to re-frame their thinking on what a “wish list” is and how it relates to the record they are creating.
For a recent customer I had to deal with this challenge head-on, and I wanted to share what I think was quite an elegant solution, allowing a requestor to save the same record producer as a draft, multiple times.
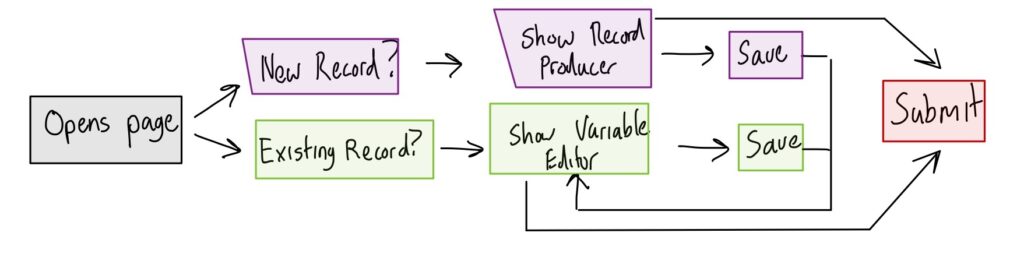
The solution works by creating a new widget which – depending whether you’re creating a new record, or editing an existing one – alternates between showing the out-of-box Record Producer widget embedded, or the out-of-box Variable Editor widget embedded. Saving triggers the appropriate action on the visible widget, keeping the record is in “draft” state until the submit button is pressed.
The rest of the article describes the steps you can follow to set up a proof-of-concept solution in your own instance.
Prerequisites
Table Configuration
The first thing that needs to be done is to ensure that the table is set up correctly. Both a draft state, and a submitted state will need to exist on the table. In my case, the draft state had the value -5, and submitted had the value 0. Ensure that the draft state is the default state for that table.
The draft state will be used to store records which the user is still wanting to edit, so ACL’s will also need to be adjusted to accommodate this. Editing ACL’s is outside the scope of this article, however please see the ServiceNow Docs website for more information about this. In particular, ensure that the requestor has the ability to edit the variables while the record is in draft state.
Record Producer
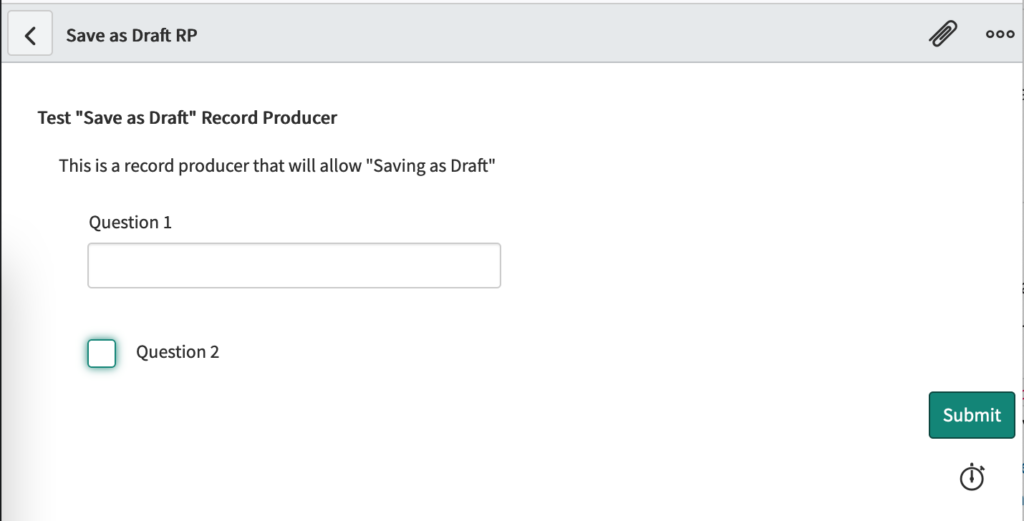
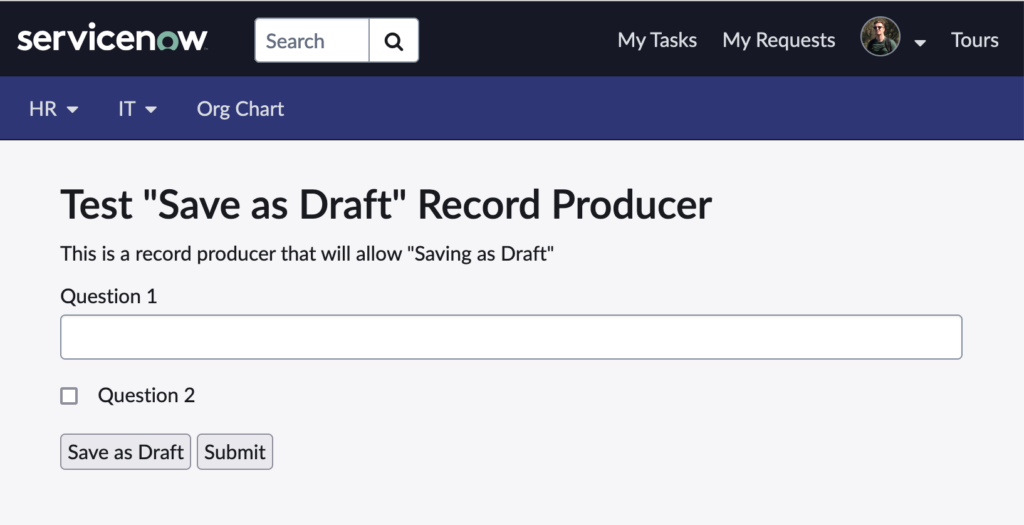
We then need to set up our record producer. Once again this is outside the scope of the article, however make sure that the table field is set correctly, and you have all your variables defined and editable when in draft state. For my testing I created a very simple record producer pointed at the Incident table with 3 variables attached, which looked like the below in UI16:
Also, do not worry yet about what happens after the record producer is submitted. In a typical record producer, one would use the script field to set values for the table fields (based on what the requestor submitted in the variables). However, because we are saving the record as a draft initially, we don’t want to use this functionality. Instead, we will use a Flow to copy the values from the variables to the fields whenever the draft record is changed/submitted.
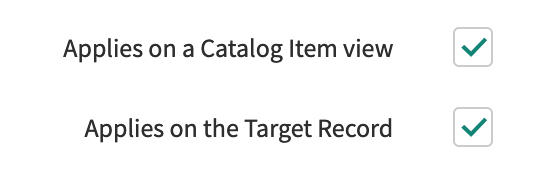
If your record producer has Catalog UI Policies or Catalog Client Scripts, ensure they are set to run on both the catalog item view, and the target record view.
Widgets
We will be making use of two out-of-box widgets, embedded in a new custom widget to reduce the amount of work that it will need to do.
Catalog Item (SC Catalog Item)
We will actually not be using this widget directly. Instead, we will borrow it’s concept of using the spModel directive in the HTML template. We will pass data into it sourced from the server using the $sp.getCatalogItem() function.
The spModel directive does the entirety of the heavy lifting when it comes to rendering a record producer form, such as rendering the fields and their functionality, and handing UI policy & client scripts.
Although we are trying to minimise the amount of code our own widget “owns” (and thus we have to support the functionality of), using spModel directly gives us exactly what we need without the complexity of the actual Catalog Item widget. Using this code is also unlikely to break in a future release of ServiceNow – and if it does, it should be easy to fix.
Variable Editor (sp-variable-editor)
The Variable Editor widget takes in the sys_id and table options to point at an existing record, and shows the variables associated with it.
Similar to the Catalog Item widget, this one also uses the spModel directive underneath the hood. This directive emits an AngularJS event which can be captured by the client script to give access to GlideForm, and allow us to save changes made to the variables.
Creating our widget
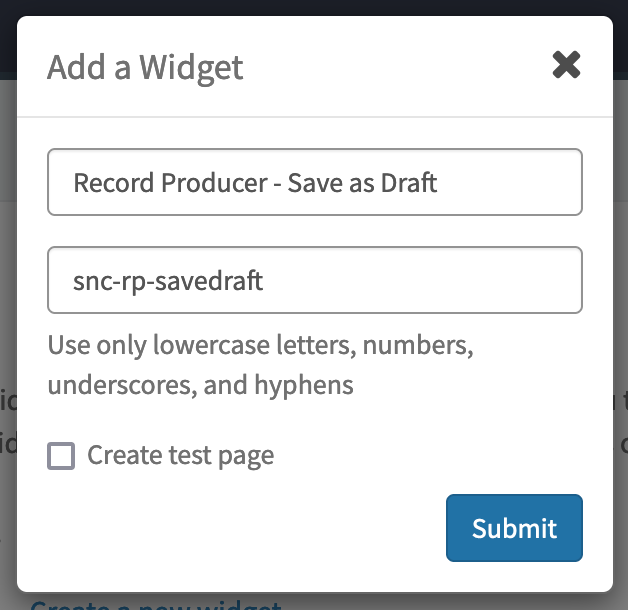
Implementing this solution requires creating a brand new widget. If required, a lot of flexibility and capability can be built into this widget. However, for the purposes of this article I’m just going to simplify things by hard-coding parts so that I can ensure the key parts of it are not lost in complexity. I’ll cover later ways that the widget could be improved to make it more flexible.
So let’s create our new widget, called Record Producer – Save as Draft. I’ve given mine the ID snc-rp-savedraft.
We’re going to start with the server script first, which we will set to the below:
Server Script
(function() {

	// hard-coded variables. Widget could be improved so that these could be defined
	// via configuration, URL parameters, or through a config table.
	var recordProducerSysId = 'f30d4d4a1bdef01026798485604bcba1';
	data.tableName = 'incident';

	// Allow the client script to mark a record as "submitted"
	if (input && input.action === 'submit') {
		var gr = new GlideRecord(data.tableName);
		gr.get(input.sysId);
		gr.setValue('state', '0');
		gr.update();

	} else {

		// Check the URL for the sys_id parameter (which means an existing record)
		data.sysId = $sp.getParameter('sys_id');

		// If the URL parameter is not set, we know we want to create a new record
		data.isNewRecord = !data.sysId;

		// Get the record producer form model
		data.recordProducerForm = $sp.getCatalogItem(recordProducerSysId);

		if (data.isNewRecord) {

			// if it's a new record, generate a Sys ID
			// which is needed to submit the record producer
			data.sysId = gs.generateGUID();

		} else {

			// If it's an existing record, get the variable editor widget
			data.varWidget = $sp.getWidget('sp-variable-editor', {
				sys_id: data.sysId,
				table: data.tableName,
				hide_container: true // don't show the border
			});
		}

	}

})();
Using the above code is everything we will need from the server to load the form in both new, and edit mode. It also handles the server-side action of updating the record to “submitted” state.
Out of box, the variable editor has a footer with a Save button in it. Although we’re using the Variable Editor widget’s hide_container option to hide the outer container and heading, there’s no configurable way to hide this footer.

We’ll be using GlideForm to save/submit the variables, so there’s no need for this save button. We can hide it by adding the below to the CSS – SCSS field of the widget.
CSS – SCSS
.panel-footer {
	display: none;
}
Now that we’ve populated the server’s data variable with all the data we need on the client side, we can create the HTML template of the widget.
HTML Template
<h1>{{::c.data.recordProducerForm.short_description}}</h1>
<div ng-bind-html="::c.data.recordProducerForm.description"></div>
<div ng-switch="::c.data.isNewRecord">
  <div ng-switch-when="true">
    <sp-model form-model="c.data.recordProducerForm" mandatory="true"></sp-model>
  </div>
  <div ng-switch-when="false">
    <sp-widget widget="c.data.varWidget"></sp-widget>
  </div>
  <div>
    <button ng-click="c.save();">${Save as Draft}</button>
    <button ng-click="c.submit();">${Submit}</button>
  </div>
</div>
In this template, we are showing the title and description of the record producer, and using the ngSwitch directive to – depending on whether we’re viewing a new or existing record – toggle between showing the record producer, or the variable editor. We also have a button for saving, and a button for submitting.
The most complex part of the widget is certainly the client script, but hopefully the in-line comments below make it easy to follow what’s happening inside.
Client Script
api.controller = function ($scope, $q, spScUtil, $location) {
	var c = this;

	/**
     * INITIALISATION
     */

	// Capture the GlideForm event emitted by spModel, which we will use
	// to save changes made to the variable editor.

	var gForm;

	$scope.$on('spModel.gForm.initialized', function (e, gFormInstance) {
		gForm = gFormInstance;
	});

	/**
     * FORM ACTIONS
     */

	// Because both saveVariables() and saveRecordProducer() return a promise,
	// we can use "chaining" to register a function to be executed after the
	// save operation has happened.

	c.save = function () {
		saveForm().then(function () {
			// put the sysID in the URL if its not already there, triggering a refresh
			// and thus swapping from the record producer form to the variable editor.
			$location.search('sys_id', c.data.sysId);
		});
	}

	// In the case of submit, after the save operation has happened we will want to
	// move the record from draft state, to submitted state.

	c.submit = function () {
		saveForm().then(function () {

			// mark the record as submitted
			c.server.get({
				action: 'submit',
				sysId: c.data.sysId
			}).then(function () {

				// redirect to a "submission successful" page
				$location.search({
					sys_id: c.data.sysId,
					table: c.data.tableName,
					id: 'form' // Ideally a page stating submission was successful, but for now just "form".
				});
			})

		});
	};

	/**
     * HELPER FUNCTIONS
     */

	// Depending on whether this is a new record, either save the record
	// producer, or save the variable editor.
	function saveForm() {
		return c.data.isNewRecord ? saveRecordProducer() : saveVariables();
	}

	// This function uses the $q service to allow it to operate asynchonously.
	// That is, the function returns a promise, allowing chaining on the result
	// e.g. saveVariables().then( /** do stuff */ );

	function saveVariables() {
		return $q(function (resolve) {
			gForm.$private.events.on('onSubmitted', resolve);
			gForm.submit();
		})
	}

	// spScUtil.submitProducer() already returns a promise, so there's no need to use
	// $q here. This function is an almost exact copy of the functionality from the
	//out-of-box SC Catalog Item widget.

	function saveRecordProducer() {
		return spScUtil.submitProducer(
			c.data.recordProducerForm.sys_id,
			(function (fields) {
				var reqData = {};
				for (var obj in fields)
					reqData[fields[obj].name] = fields[obj].value;
				return reqData;
			})(c.data.recordProducerForm._fields),
			c.data.sysId,
			{});
	}

};
With the above 4 fields complete, we now have a fully operational widget giving a record producer save as draft functionality. You can see below the experience for a requestor when they use this widget.
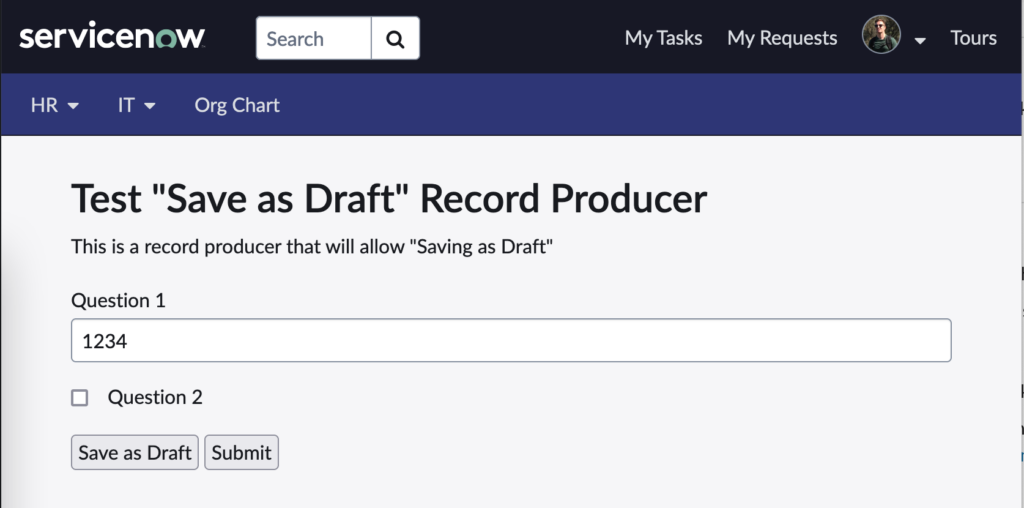
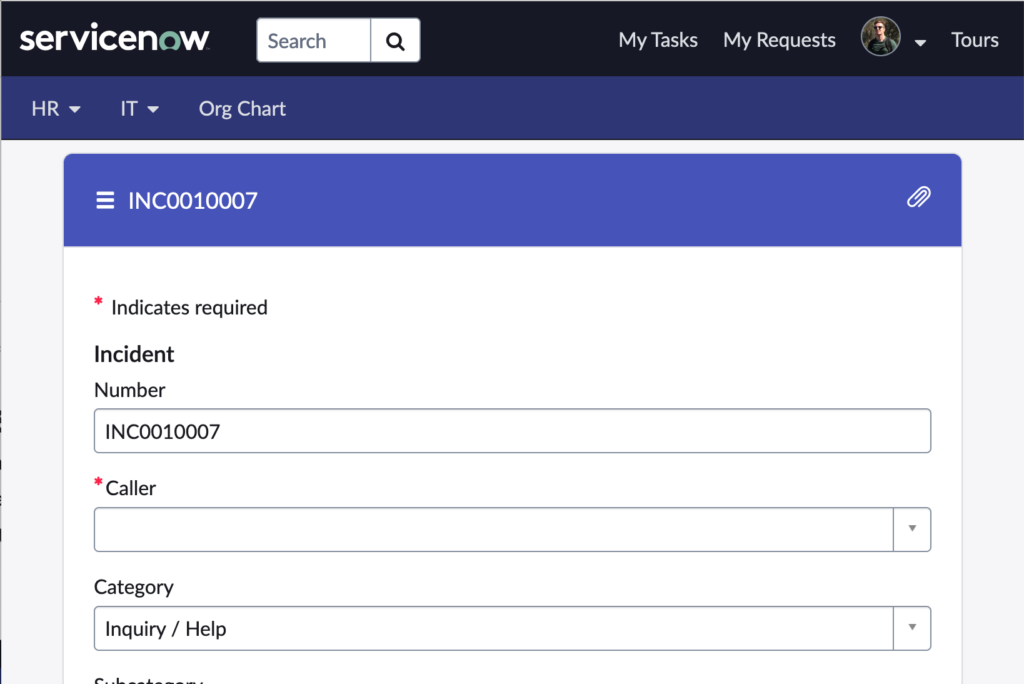
Even though in step 1 and 2 above completely different widgets are showing, this fact is completely imperceptible to the requestor.
Improvements
There’s a number of improvements that would really need to be made to this experience to use it in a production environment.
Firstly, the experience would need to have a list of all draft records that the user has created, with links to open the draft. In my case, it would be any incidents in the draft state (-5). However, this would obviously change per use case. If you are using this technique for multiple record producers, you may want to have a single list showing all draft records from multiple tables.
Another improvement to the experience (as noted on line 49 of the client script) would be to create a confirmation page, stating that the record was submitted successfully, showing the ticket number, and offering a link back to the home page or to the details page of the record they submitted.
Lastly, the widget itself isn’t very flexible. The table name and the record producer are both hard-coded. If you were going to use this technique for multiple record producers on a portal it maybe a good idea to add options to the widget to increase its configurability. This will allow you to reuse this one widget in multiple places dragging it onto pages via page designer, and configure the table, record producer, and other settings via the options dialog there.
Flow Designer
As a final step we need to define how the responses by the requestor get mapped to fields on the record. In a typical record producer this would be done via the Script field on the record producer, or via the Map to field setting of a variable. However, those methods take effect upon record creation which doesn’t help us, as we are editing the variables post-record creation – when the record is in draft state. Instead we will use a Flow to achieve the desired outcome.
The Flow will be applied to the table we’re generating records for. In my case, the incident table. We will want it to run whenever the record changes in draft state, or changes to the submitted state, for each unique change:

At its most basic, the flow simply needs to do two things. First, find out what variables exist on the generated record, and then update the generated record’s fields based on the values of those variables.
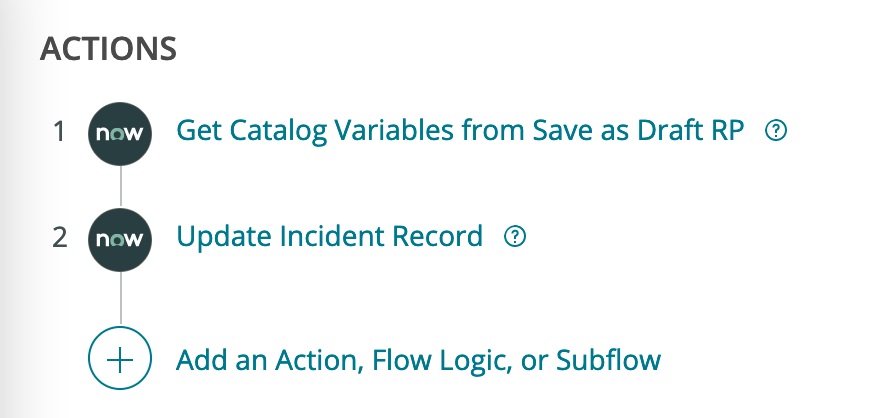
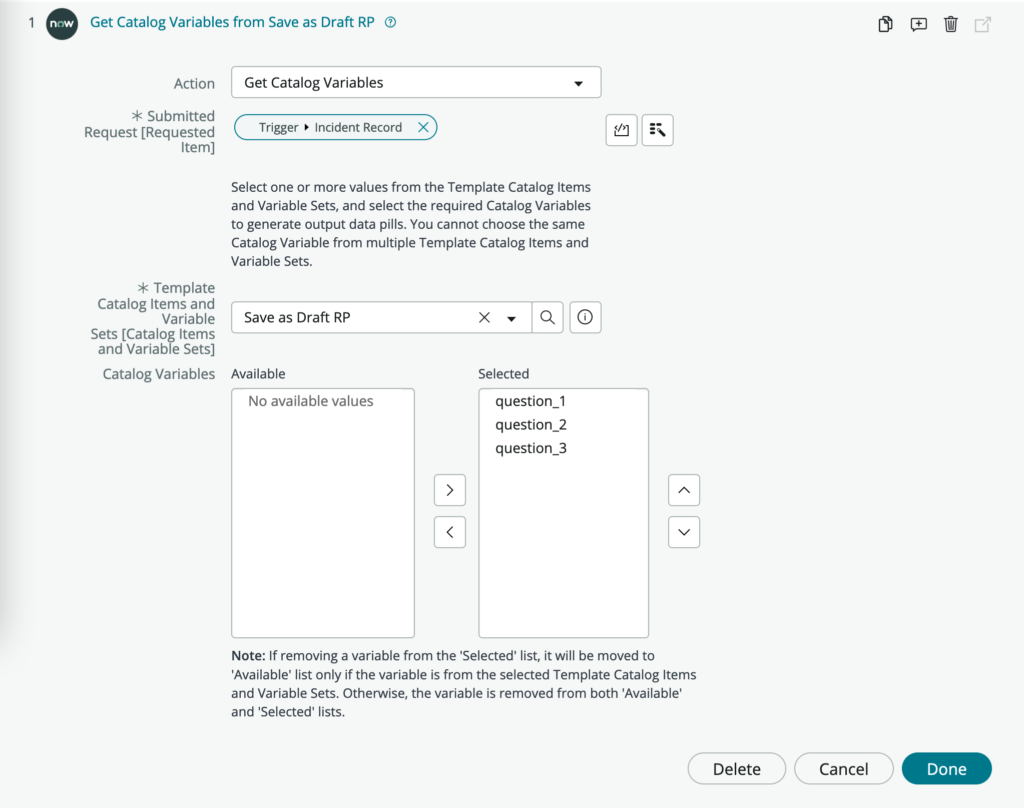
In the first step, we specify the record to get the variable values from, a record producer that defines those variables, and from those variables which ones we want access to.
The second step, we will use the values retrieved from those variables in the data pill picker, to update the Description field.
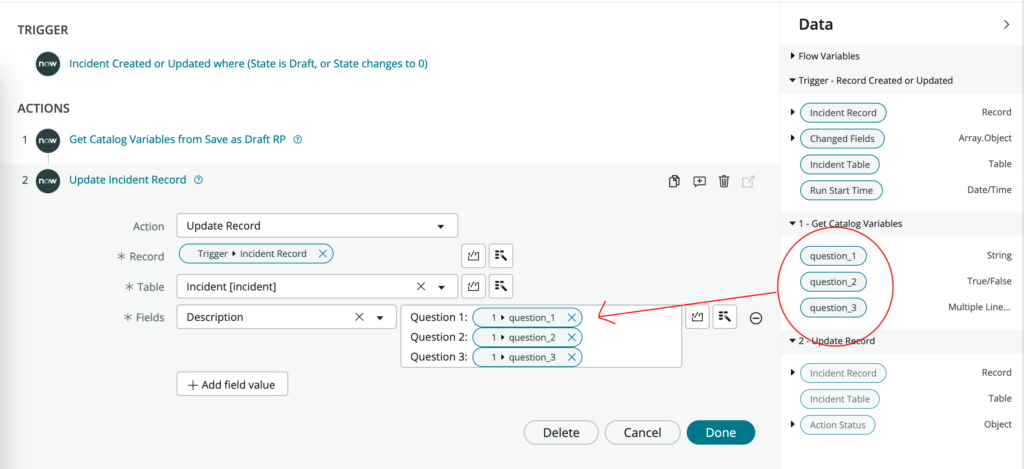
Of course, you will likely want to do something more complex than just set the Description field.
Conclusion
I hope this has helped show how “save as draft” record producers are absolutely possible in Service Portal, and in fact they are quite easy to achieve.